How To Take Better Lash Photos
Everybody wants to be good-looking and click good pictures that make the audience pause and stop scrolling for a minute. If you can click such a photo, it does not take you a lot of time to upload it on your social media profile for your friends and family to see how you are rocking that look gorgeously.
Let us tell you a little secret. There is a way to enhance your pictures even more. How? Simply by wearing false eyelashes.
The falsies will give your lashes a visible thickness and volume, which will intensify the appeal of your favorite picture.
What Is The Purpose Of False Lashes?
False eyelashes are one of the essential tools in the makeup world. Wearing falsies can completely revamp your look into a gorgeous one.
By adding fantastic volume and evenness to your natural lashes, falsies are really the one tool you definitely need to nail your photos. They hide your real lash hairs if they are sparse and uneven and make the area around your eye pretty.
Wear Your False Eyelashes Perfectly!
This is the foremost step you need to follow if you want to take better lash photos. Having thick and long eyelashes will surely bring all the attention to your picture if you wear them properly.
Therefore, to make sure you do not mess up any step, we will guide you through the process. Follow these steps, and you will have those picture-perfect lashes.
- First, you have to prepare your natural lashes.
- Then, apply a lash glue in a fine line with a cotton bud. Hold your natural lashes with a tweezer to avoid them getting in the way.
- Wait for the glue to dry for at least 30 seconds. The falsies will stick more firmly in their place if you follow this step.
- Using tweezers to hold your falsies, put them on your lash line with immense focus to make sure they are in the right place. Press the falsies lightly so that they can stick onto the lash band.
- Once they are entirely in place, use eyeliner or mascara to even the line or hide any spots that may not go well with the lash look. It will help the false eyelashes blend in nicely onto your lash line without appearing fake.
How To Take Better Lash Photos?
In order to take better lash photos, some ways will help you out. Do not worry because we will make you aware of some tips and tricks you can use to capture the picture-perfect lashes in this part of the article. Let us hop on to the now.
- This is the one piece of advice you have to follow no matter what happens. It would be best to choose a pair of false eyelashes that complements your eye and face shape. We know how tempting some of the falsies can be, but you should not pick them until you are sure that they match your eye shape. If you go for long eyelashes with small eyes, the results will not be impressive. There is a perfect false eyelash there for every eye shape. So, do some research and get your hands on the best one out there.
- Get bright lights – The key to nailing almost every picture, good lightning. When you take a picture in a well-lit area, your eyelashes and all the detailing around them will appear more noticeable. Try out different light positions until you find the perfect one, and then be ready to capture a nice lash photo.
- Take photos from multiple angles – There is no harm in clicking several pictures. There will be one picture perfect lash photo hidden in those thousands of imperfect clicks; we are certain about that. Those extra minutes you spend trying different angles will be worth it in the end, and you will surely not regret it.
- Clean your camera lens – This is a general tip but very effective. Clean your camera lens before starting the shoot to make sure there are no impurities that will interfere with the quality.
- Use lash glue – We recommend you use lash glue that is the same color as the lash hair. The glue will not look odd in your pictures this way. If you go for a whitelash glue, some of it might be left around the edges that can make your lash photos look ugly.
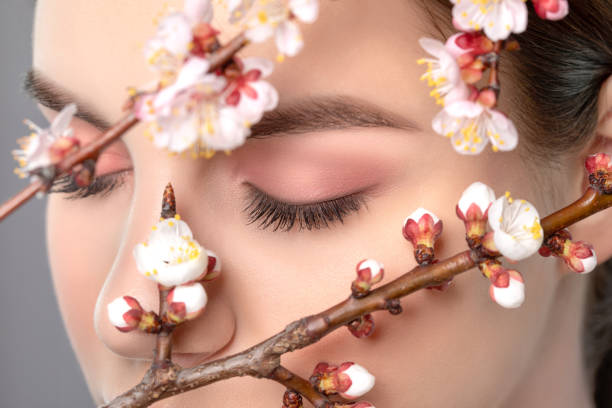
- Focus on the area around your eyes – Take a close-up photo of your face if you want the false eyelashes to be the star of the shot. The falsies will appear bigger and thicker, taking your picture to an entirely new level of aesthetic. Your social media followers will be a fan of your lash photos.
- Little curl to your falsies – Give your false eyelashes a little curl once you have applied them perfectly onto the lash line. This will enable them to blend in better, giving your photos a more natural appeal.
The Best False Eyelashes: People Should Pick For Lash Photo
We know how hard it is to find that one pair of false eyelashes that will become our ultimate favorite! We have got you covered here as well.
We are introducing you to Appearanz, an all-in-one place for all makeup lovers. Here, you will come across the best and the chicest picture-perfect lashes available out there.
- Sun Goddess is one amazing pair of 3D false eyelashes made from faux mink to last for a long time. In addition, the unique color variation will make these falsies a bold choice that everybody will appreciate. The nicely made clusters add beautiful volume and thickness to your lashes.
- The Sparkler comes in a gorgeous shade of black with a desirable length. It will sit greatly on your eyes. Plus, the evenly distributed length of lash hair creates those curls you wanted so badly. They will last comfortably all day long.
Now that you know all the essential tips and tricks to capture better lash photos, we wish you the very best of luck. Go and rock your eyelash photos!